Rope Splicing Techniques Guide - How to Splice Marine Rope
Master professional rope splicing techniques with our comprehensive guide. Learn the essential skills for creating strong, reliable splices in marine rope - from basic eye splices to advanced techniques. Perfect for boat owners, sailors, and marine professionals in the UK.
Why Learn Rope Splicing?
- Stronger than knots - Splices retain 95%+ of rope strength vs 50-60% for knots
- Professional appearance - Clean, permanent connections for marine applications
- Cost effective - Create custom lengths and eye splices in-house
- Essential skill - Traditional seamanship knowledge for serious sailors
- Repair capability - Fix damaged rope ends and create emergency repairs
New to Splicing?
We offer a professional splicing service if you prefer expert results while you're learning.
Learning Benefits:
- Emergency repairs at sea
- Custom rope configurations
- Traditional seamanship skills
- Cost savings on future projects
Essential Splicing Tools
Professional results require the right tools:
Basic Tool Kit
- Splicing Fid: Hollow metal or plastic tube for threading strands
- Pusher/Swedish Fid: Solid tool for opening rope strands
- Sharp Knife: Clean cuts prevent fraying
- Tape: Whipping tape to secure strand ends
Advanced Tools
- Needle Sets: Various sizes for different rope diameters
- Wire Threader: For difficult strand placement
- Measuring Tools: Accurate eye size and splice length
Learning Tips for Success
Professional advice for mastering rope splicing:
Beginner Guidelines
- Start Large: Use 10mm+ diameter rope - easier to handle
- Choose Right Rope: Braid-on-braid or 12-strand for learning
- Use New Rope: Fresh rope splices easier than compressed/used rope
- Practice First: Master basics before attempting critical splices
Setup Requirements
- Strong Anchor Point: Essential for setting splices properly
- Good Lighting: See strand details clearly
- Clean Workspace: Prevent contamination and tangling
Types of Marine Rope Splices
Different splicing techniques for various marine applications:
| Splice Type | Best Applications | Difficulty Level | Strength Retention | UK Marine Uses |
|---|---|---|---|---|
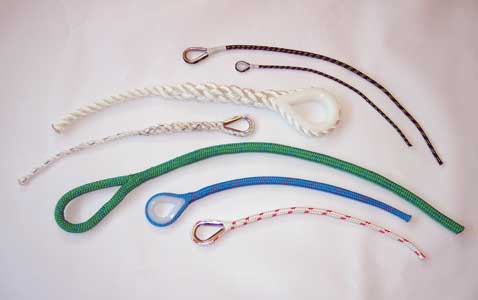
| Eye Splice | Permanent loops, shackle attachment | Beginner | 95-100% | Anchor lines, dock lines, sail attachment |
| Back Splice | Rope end finishing, prevent fraying | Beginner | 100% | Sheet ends, halyard tails, general finishing |
| Short Splice | Joining two rope ends permanently | Intermediate | 90-95% | Extending rope length, permanent repairs |
| Long Splice | Joining ropes without thickness increase | Advanced | 85-90% | Through blocks, winch applications |
| Chain Splice | Rope-to-chain connections | Intermediate | 90-95% | Anchor rodes, mooring systems |
Essential Tips for Learning to Splice Rope
Splicing rope will take a bit of practice, but it is a skill almost everyone can master with a little effort.
Choosing the Right Rope for Learning
Some rope types due to the construction and fibres are almost impossible to splice and used rope is much more difficult than brand new rope due to the compression and stiffening of the fibres, so start with some new rope such as Braid on Braid or 12-Strand.
Splicing small diameter rope is also very tricky and not the best place to start so begin with 10mm or 12mm diameter rope.
Setting Up Your Workspace
It is very helpful to have a strong point on to which you can tie the rope to pull against, hard, this helps when setting the splice back into the cover. Don't use your door handle you will likely break it off. (Yes I have broken a few things in the past pulling a splice.)
On a boat I use the winch or cleat but at home this is a bit more difficult. One idea is to get a strong bit of wood longer than the width of your door frame and pull against it spanning the doorway.
Professional Experience Tips
- Start with new rope: Fresh rope splices much easier than compressed or stiffened used rope
- Use larger diameters: 10mm+ rope is much easier to handle when learning
- Choose the right construction: Braid-on-braid and 12-strand are ideal for beginners
- Create a strong anchor point: Essential for proper splice setting (learn from my broken door handles!)
- Practice makes perfect: Every splice teaches you something new about rope behavior
Video Tutorials - Watch Professional Splicing Techniques
Follow these video tutorials to see professional rope splicing techniques demonstrated step by step:
If you would like us to add more tutorial videos please contact us and let us know.
Common Splicing Mistakes to Avoid
Learn from professional experience to create perfect splices:
Mistake #1: Wrong Rope Choice
Problem: Using old, compressed, or unsuitable rope construction
Solution: Start with fresh braid-on-braid or 12-strand rope, 10mm+ diameter
Mistake #2: Inadequate Working Length
Problem: Running out of rope before completing splice
Solution: Allow 8-10x rope diameter minimum working length
Mistake #3: Loose Splice
Problem: Splice loosens under load, reducing strength
Solution: Fair splice properly, use strong anchor point for setting
Mistake #4: Inconsistent Tucks
Problem: Uneven strand placement weakens splice
Solution: Maintain consistent tuck pattern, count carefully
Mistake #5: Insufficient Tucks
Problem: Too few tucks allow splice to pull out
Solution: Minimum 3 full tucks, 5 for critical applications
Mistake #6: Poor Finishing
Problem: Rough ends cause injury and look unprofessional
Solution: Trim cleanly, seal ends if required, whip if needed
Rope Types and Splicing Difficulty
Different rope constructions require different splicing approaches:
| Rope Construction | Splicing Difficulty | Best Splice Types | Special Considerations |
|---|---|---|---|
| 3-Strand Twisted | Easy | All traditional splices | Classic technique, follows natural lay |
| 8-Strand Plaited | Easy-Medium | Eye splice, back splice | Even number of strands, symmetrical pattern |
| 12-Strand Braided | Medium | Eye splice, chain splice | Good for learning, clear strand structure |
| Braid-on-Braid | Medium-Hard | Eye splice (core & cover) | Two-stage process: core first, then cover |
| Dyneema/UHMPE | Hard | Specialized techniques only | Slippery material, requires specific methods |
Professional Splicing Services
While learning to splice is valuable, professional services ensure perfect results for critical applications:
When to Use Professional Services
- Critical Safety Lines: Lifelines, jackstays, safety tethers
- High-Load Applications: Anchor rodes for large vessels
- Difficult Materials: Dyneema, aramid, specialty fibers
- Complex Splices: Multi-strand, tapered, custom configurations
- Time-Critical Projects: When you need guaranteed results
- Insurance Requirements: Some policies require certified work
Our Professional Services
- Eye Splices: Any size, any material, custom dimensions
- Chain Splices: Rope-to-chain connections for anchoring
- Custom Lengths: Cut-to-length with professional finishing
- Repairs: Damaged rope restoration and reinforcement
- Consultation: Advice on splice selection and rope choice
- UK Delivery: Fast turnaround for urgent requirements
Advanced Splicing Techniques
Once you've mastered basic splices, these advanced techniques open up new possibilities:
Tapered Splices
Gradually reduce rope thickness for smooth passage through blocks and fairleads. Essential for racing applications and high-efficiency systems.
Transition Splices
Connect different rope types or materials. Useful for optimizing different sections of the same line for specific characteristics.
Compression Splices
Create permanent connections in hollow braid ropes using internal compression. Popular for modern synthetic rigging.
Interested in advanced techniques? Contact us for specialized training or custom splicing solutions.